Posts mit dem Label Oracle Linux configuration werden angezeigt. Alle Posts anzeigen

Freitag, 9. Januar 2015

Configure Firefox Java Browser plugin

Although Java might be installed on your Oracle Linux system, your browser might not know Java.
So, this is how to get your firefox up to speed.

1. Identify Java Install locations (Remember this document - No. 7)

Become User "root":

$ su -Password:
# 

Query the standard java directory on Oracle Linux:

# ls -l /usr/java/
total 8
lrwxrwxrwx. 1 root root   16 Jan  9 13:24 default -> /usr/java/latest
drwxr-xr-x. 8 root root 4096 Jan  9 13:49 jdk1.7.0_71
drwxr-xr-x. 9 root root 4096 Jan  9 13:40 jdk1.8.0_25
lrwxrwxrwx. 1 root root   21 Jan  9 13:40 latest -> /usr/java/jdk1.8.0_25


2. Find Mozilla Firefox Plugin Directory

2.1 Check your browser binary version
This is important, where to find the library!
(Firefox must be running.)

# ps -ef|grep firefox
root     12536 28294  0 14:53 pts/4    00:00:00 grep firefox
oracle   13105     1  6 11:51 ?        00:11:57 /usr/lib64/firefox/firefox


Mine is 64bit, so I have to use the 64bit plugin.

2.2 Navigate to standard Mozilla plugin directory

# cd /usr/lib64/mozilla/plugins

3. Check for existing symbolic links to the mozilla plugin

First check, if there is a link to the libnpjp2.so file:

# ls
libflashplayer.so  libtotem-cone-plugin.so  libtotem-mully-plugin.so
libnpjp2.so        libtotem-gmp-plugin.so   libtotem-narrowspace-plugin.so


4. Close your Firefox Browser!


5 Remove existing symbolic link

rm libnpjp2.so
rm: remove symbolic link `libnpjp2.so'? y


6 Create new symbolic link

# ln -s /usr/java/jdk1.7.0_71/jre/lib/amd64/libnpjp2.so

7 Test your Java Browser Plugin

Open Firefox and open Java Test Page:
https://www.java.com/en/download/help/testvm.xml
The output should be similar to mine:

Verified Java Version

Completion checkmark

Congratulations!

You have the recommended Java installed (Version 7 Update 71).

How To Install and manage Java JDK on Oracle Linux

Every Time I set up an Oracle Linux server, I ask myself, how have I done it last time ...

1. Check which Java Version (JDK7, JDK8, ...) is certified with your software.
e.g. Oracle Fusion Middleware supported system configurations:
http://www.oracle.com/technology/software/products/ias/files/fusion_certification.html

2. Check support policy, esp. end of life for your desired Java Version
http://www.oracle.com/technetwork/java/javase/downloads/eol-135779.html

3. Download JDK
http://www.oracle.com/technetwork/java/javase/downloads/index.html

4. Install JDK

# ls -l jdk*
-rw-r--r--. 1 oracle oinstall 126679286 Jan  9 13:01 jdk-7u71-linux-x64.rpm
-rw-r--r--. 1 oracle oinstall 142191827 Jan  9 13:06 jdk-8u25-linux-x64.rpm


# rpm -Uhv jdk-7u71-linux-x64.rpm
Preparing...                ########################################### [100%]
   1:jdk                    ########################################### [100%]
Unpacking JAR files...
    rt.jar...
    jsse.jar...
    charsets.jar...
    tools.jar...
    localedata.jar...
    jfxrt.jar...


5. Check Java Version

# java -version
java version "1.7.0_71"
Java(TM) SE Runtime Environment (build 1.7.0_71-b14)
Java HotSpot(TM) 64-Bit Server VM (build 24.71-b01, mixed mode)


If this is your expected Java Version - fine! Your are done!
If you still have a pointer to an older version, move on ...

...

6. A non expected Java Version is present?     lets say, JDK8 is still present, but you need to move back to JDK7

# java -version
java version "1.8.0_25"
Java(TM) SE Runtime Environment (build 1.8.0_25-b17)
Java HotSpot(TM) 64-Bit Server VM (build 25.25-b02, mixed mode)


7. Check Java install locations

# ls -l /usr/java/
total 8
lrwxrwxrwx. 1 root root   16 Jan  9 13:24 default -> /usr/java/latest
drwxr-xr-x. 8 root root 4096 Jan  9 13:49 jdk1.7.0_71
drwxr-xr-x. 9 root root 4096 Jan  9 13:40 jdk1.8.0_25
lrwxrwxrwx. 1 root root   21 Jan  9 13:40 latest -> /usr/java/jdk1.8.0_25


8. Make use of alternatives system to switch between versions

8.1 Syntax of alternatives

# /usr/sbin/alternatives
alternatives version 1.3.49.3 - Copyright (C) 2001 Red Hat, Inc.
This may be freely redistributed under the terms of the GNU Public License.

usage: alternatives --install
                    [--initscript ]
                    [--slave ]*
       alternatives --remove
       alternatives --auto
       alternatives --config
       alternatives --display
       alternatives --set

common options: --verbose --test --help --usage --version
                --altdir --admindir


8.2 Register your JDKs for alternatives

usage: alternatives --install

# /usr/sbin/alternatives --install /usr/bin/java java /usr/java/jdk1.7.0_71/bin/java 17071

(where priority represents 17071 for jdk1.7.0_71)

# /usr/sbin/alternatives --install /usr/bin/java java /usr/java/jdk1.8.0_25/bin/java 18025

(where priority represents 18025 for jdk1.8.0_25)

8.3 Now to switch between the versions

8.3.1 Check current java version, again

# java -version
java version "1.8.0_25"
Java(TM) SE Runtime Environment (build 1.8.0_25-b17)
Java HotSpot(TM) 64-Bit Server VM (build 25.25-b02, mixed mode)


8.3.2 Change the current java version

 # /usr/sbin/alternatives --config java

There are 2 programs which provide 'java'.

  Selection    Command
-----------------------------------------------
   1           /usr/java/jdk1.7.0_71/bin/java
*+ 2           /usr/java/jdk1.8.0_25/bin/java

Enter to keep the current selection[+], or type selection number: 1


8.3.3 Check your current java version has changed

# java -version
java version "1.7.0_71"
Java(TM) SE Runtime Environment (build 1.7.0_71-b14)
Java HotSpot(TM) 64-Bit Server VM (build 24.71-b01, mixed mode)


9. Keep your path JDK dynamic

The idea is, when you install for example WebLogic Server, to use a dynamic location to your JDK.
I do this with a symbolic link.
I have a folder /opt/oracle/java where I create a symbolic link, that points to the jdk.
As normal user I create the symbolic link:

$ ln -s /usr/java/jdk1.8.0_25 /opt/oracle/java/java

When an updated jdk version in available, after install I only change the symbolic link:

$ rm /opt/oracle/java/java
$ ln -s /usr/java/jdk1.8.0_31 /opt/oracle/java/java

For the WebLogic Server, the path to java will remain. No reconfiguration is needed.
So I only have to restart the WebLogic Server to use the latest JDK.

10. Tidy up! - delete out of date JDKs

10.1 Remove rpm

To delete the out-of-date versions of the JDK:
Query for all installed JDK rpms:
# rpm -aq | grep -i jdk
jdk1.8.0_31-1.8.0_31-fcs.x86_64
jdk-1.7.0_85-fcs.x86_64
jdk1.8.0_60-1.8.0_60-fcs.x86_64

In this example, I need to remove the jdk1.8.0_31:
# rpm -e jdk1.8.0_31-1.8.0_31-fcs

Check that the rpm has been deleted:
# rpm -aq | grep -i jdk
jdk-1.7.0_85-fcs.x86_64
jdk1.8.0_60-1.8.0_60-fcs.x86_64

10.2 De-register the java alternatives entry

Now we need to de-register the jdk in the alternatives configuration:
Current alternatives configuration:
# /usr/sbin/alternatives --config java

There are 3 programs which provide 'java'.

  Selection    Command
-----------------------------------------------
   1           /usr/java/jdk1.7.0_75/bin/java
   2           /usr/java/jdk1.8.0_31/bin/java
*+ 3           /usr/java/jdk1.8.0_60/jre/bin/java

We need to remove selection No 2:
# alternatives --remove java /usr/java/jdk1.8.0_31/bin/java

Check again:
# /usr/sbin/alternatives --config java

There are 2 programs which provide 'java'.

  Selection    Command
-----------------------------------------------
   1           /usr/java/jdk1.7.0_75/bin/java
*+ 2           /usr/java/jdk1.8.0_60/jre/bin/java

Enter to keep the current selection[+], or type selection number: 2


Voilà!

Samstag, 8. November 2014

Avahi fails on Oracle Linux startup

avahi-daemon fails on startup of Oracle Linux.

What is Avahi? - Please see here in wikipedia.

I decided to disable the daemon on my Oracle Linux Server:
 
service avahi-daemon stop 
chkconfig avahi-daemon off

Donnerstag, 4. Juli 2013

HowTo Install adobe flash player for firefox 64bit on Oracle Linux

  1. Get flash Player for Linux 64bit:
    http://get.adobe.com/flashplayer/
    I downloaded both, the
    - yum for linux (to easy get updates with yum in future)
    - *.tar.gz version
  2. Identify as root user and install yum version download with
    package installer or by command line as user root i.e.:
    # rpm -Uhv adobe-release-x86_64-1.0-1.noarch.rpm
  3. Now we have to move the "libflashplayer.so" into the mozilla plugin directory.
    1. Open a terminal window, become root user:
      # su -
      Unzip the *.tar.gz file
      # gunzip *.tar.gz
      The *.tar file remains.
      # tar -xf *.tar
      This should extract the "libflashplayer.so" file we need to move to the mozilla plugins directory.
    2. Verify the mozilla plugin directory exists:
      /usr/lib64/mozilla/plugins  (if the plugins directory does not exist, create it)
    3. Close your firefox, if it is still running.
    4. Copy the "libflashplayer.so" to the mozilla plugins directory:
      cp libflashplayer.so /usr/lib64/mozilla/plugins
  4. Open Firefox again and test your flash player configuration:
    http://www.adobe.com/uk/software/flash/about/

Dienstag, 13. November 2012

Install and configure VirtualBox Image with Oracle Linux for Oracle Database and Oracle Fusion Middleware

Download required Software
- Oracle Linux 6
Install Virtual Box
- There should not be any difficulty. 
- After installing, start Virtual Box
  - Menue: Virtual Box - preferences:
    Tab Extensions: Install the Virtual Box Extensions if needed.

Create Virtual Maschine
- Menue: Maschine - New
- Name and operating system:
  - Name: OL6
  - Type: Linux
  - Version: Oracle (64 bit)
  -> continue
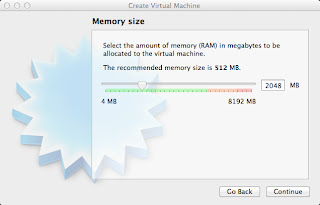
- Choose Memory size
  - depending on your host capabilities chaoose Memory size. For Oracle Database you shoud not
    start below 2GB of memory.
  - I choose 2048 MB
  -> continue
 - select to create a virtual hard drive now
   -> create
 - select hard drive type
   - VDI
   -> continue
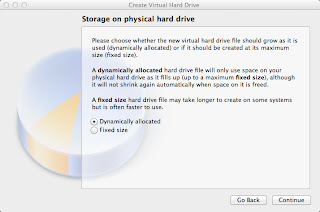
 - select method to create storage
   - dynamically allocated
     (Tip: if you plan to install Oracle RAC choose fixed size to allocate the storage now)
   -> continue
 - file location and size
   (the file location is suggested by default - see VirtualBox preferences)
   - I use the suggested location and name: OL6
   - 100 GB (so it can grow)
   -> create
 - The VM envelope is created.

Configure VM settings
- We need to change some settings:
- Menue: Maschine - Settings
 - Tab: System
   - de-select Floppy
 - Tab: Storage
   - for the IDE controller point the location where you stored your Oracle Linux iso image:
     (I choose OracleLinux-R6-U3-Server-x86_64-dvd.iso)
 - Tab: Network
   - select to
     - create Adapter 2 - "host-only"
       (I do this, because my host is a laptop and I want to use it in several locations. So with adapter 1 I
       will configure a DHCP network, that always connect to the internet by defauld, so I am able to
       get packages etc. Databases and application servers need a fixed IP adress, so I will configure
       adapter 2 with a fixed IP adress, later.)
 - Tab: Shared Folders
   - enables to mount this location within my VM, so I can exchange files between Host and Guest.
   - I choose my Downloads directory, where I have downloaded the Oracle Datbase and WebLogic
     Server.
   - Folder name: Downloads
   - select auto-mount (so the folder will be mounted automatically when starting the VM)
   -> OK
------------------------
Sometimes, in addition the Host-only network needs defining:


 Thanks to Christian for the screen shots!
------------------------

Install Oracle Linux
- start the VM

- choose install or upgrade
-> enter
- once you have checkt the install media is ok ...
-> skip
 -> next
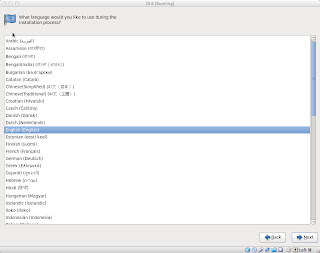
- choose the language for installation
-> next
- choose your keyboard
-> next
- choose the storage devices. I choose
- Basic Storage Devices
-> next
- specify the hostname. (i.e. ol6.de.oracle.com)
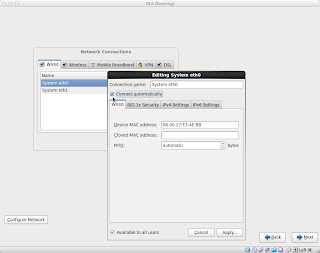
- ATTENTION:
-> click network settings
- select "connect automatically" in order to DHCP on startup
-> apply
-> next
- choose your time zone settings
-> next
- select and remember! your password for the admin user "root"
-> next
- as the 100GB parition is empty choose
- replace existing Linux Systems
- ATTENTION:
- "select "review and modify partitioning layout"
-> next
- the partition layout is not ideal. We will delete the "lv_home" partion and add this partion space to
  the "lv_root" partion
- choose "lv_home" partition
- delete 
- select the "lv_root" partion and enlarge it to the max available space (Max size is ...).
- 97864
-> OK
-> next
-> Format
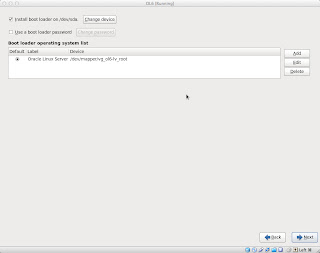
- I do not change the boot loader settings
-> next
- for the software of the Linux Server select
- Basic Server
- ATTENTION:
- select "Customize now"
-> next 
 - Base System
   - select: Base
- Servers
  - select: Server Platform
- Desktop
  - select: Desktop, Graphical Administration Tools, X-Window System
- Applications
  - select: Internet Browser
- redy to install ...
-> next
- once the install and configuration finishs, click
-> Reboot
-> Forward 
- read the License Information
- choose to agree or not agree
-> Forward
- if you have an Oracle support contract, or like to initiate one, do so. For this howto I will do so later.
-> Forward
- skip to create a user. We will add a package in a later step, that not only creates a user, but also adds
  required groups and kernel settings and so on
-> Forward
- You can choose to sysnc system time. I do not choose this for this document
-> Forward 
- I skipp Kdump, although there might be a good reason for Kdump
- Finish
- the login screen appears. As we have only the root user so far, log in as
- root
- password you have set before
-> Log In
- first I add a Terminal start button to the panel
- then I delete the Mail Icon - we will not need it
- now we configure the server with a public-yum server, where to get the latest packages and security
  updates from Oracle
- start the firefox browser. Navigate tothe page
- public-yum.oracle.com
- scroll down the web page for the "howto configure with Oracle Linux 6"
- open a Terminal
- change to the directory: ("cd" means: change directory)
- cd /etc/yum.repos.d              (Linux differs between capital letters!)
- now we download the configuration fire with a command line browser wget:
- wget http://public-yum.oracle.com/public-yum-ol6.repo
- the file shoud be configured to automatically suggest the latest repoitory and Oracle Kernel setting
- if not, edit the file with the famous editor vi:
- vi public-yum-ol6.repo
- change enabled=0 to enable=1 if needed 
- now update the Linux packages:
- yum update
- y to update suggested updates.
- y for the keys
- the kernel updates need a restart of the system:
- reboot
- the following comands are just to chek the running kernel:
- uname -a
- while the lollowing lists installed Oracle kernels:
- rpm -q kernel-uek
- next we will prepare the Linux Server for Oracle. In Oracle Linux 5 the Package oracle-validated
  represented a package which creates the oracle user, required groups, sets kernel and security 
  parameters, limits etc. and required packages. With Oracle Linux 6 oracle-validated has been
  replaced by the package "oracle-rdbms-server-11gR2-preinstall" 
 
- to install the package is easy:
- yum install oracle-rdbms-server-11gR2-preinstall
- enter
- click y to apply
- now, the system also has all required files to build the vboxadditions:
- escape out of the VM (keys are shown in the corner right down: Left "cmd")
- autorun
-> OK
- now we need to set the password for the oracle user:
- passwd oracle
- (remember the password you set!)
- only a few steps to do
- define the fixed IP adress:
- Menue: System - Preferences - Network Connections
- System eth1 - edit
- ATTENTION:
- select connect automatically
- IPv4 Settings:
- Method: Manual
- Address: 192.168.56.60   (192.168.56.x is the defauld VBox network configuration)
- Netmask: 255.255.255.0
- Gateway: 192.168.56.1
-> apply
- now we need to configure the shared folder between Host and Guest VM. We need to add the VBox
  shared folder Group to the oracle user:
- Menue: System - Administration -Users and Groups
- select the oracle user:
  - properties - scroll down and select
  - vboxsf
  -> OK
- just before the final reboot we need to edit the hosts file:
- vi /etc/hosts
- add the following line:
- IP Address               fully qualifies hostname           alias
- 192.168.56.60          ol6.de.oracle.com                    ol6
- safe and close the file:
- esc
- :
- wq!
- check the network and loopback settings
- ping ol6
- ping ol6.de.oracle.com
- hostname


- create the folders for the oracle software install:
- mkdir /opt/oracle        (mkdir: make directory)
- chown -R oracle:oinstall /opt/oracle  (chown: change owner des verzeichnisses von root an oracle)
- chmod -R 775 /opt/oracle    (Berechtigungen ändern)

- finaly it is a good moment to backup our work:
- poweroff the VM.
- export the VM:
- Menue: File - export Appliance