Download required Software
- Oracle Linux 6
Install Virtual Box
- There should not be any difficulty.
- After installing, start Virtual Box
- Menue: Virtual Box - preferences:
Tab Extensions: Install the Virtual Box Extensions if needed.
Create Virtual Maschine
- Menue: Maschine - New
- Name and operating system:
- Name: OL6
- Type: Linux
- Version: Oracle (64 bit)
-> continue
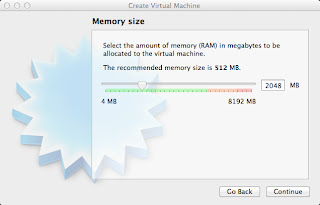
- Choose Memory size
- depending on your host capabilities chaoose Memory size. For Oracle Database you shoud not
start below 2GB of memory.
- I choose 2048 MB
-> continue
- select to create a virtual hard drive now
-> create
- select hard drive type
- VDI
-> continue
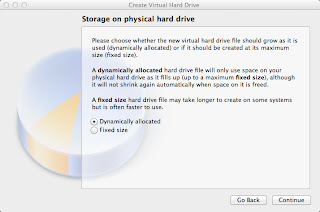
- select method to create storage
- dynamically allocated
(Tip: if you plan to install Oracle RAC choose fixed size to allocate the storage now)
-> continue
- file location and size
(the file location is suggested by default - see VirtualBox preferences)
- I use the suggested location and name: OL6
- 100 GB (so it can grow)
-> create
- The VM envelope is created.
Configure VM settings
- We need to change some settings:
- Menue: Maschine - Settings
- Tab: System
- de-select Floppy
- Tab: Storage
- for the IDE controller point the location where you stored your Oracle Linux iso image:
(I choose OracleLinux-R6-U3-Server-x86_64-dvd.iso)
- Tab: Network
- select to
- create Adapter 2 - "host-only"
(I do this, because my host is a laptop and I want to use it in several locations. So with adapter 1 I
will configure a DHCP network, that always connect to the internet by defauld, so I am able to
get packages etc. Databases and application servers need a fixed IP adress, so I will configure
adapter 2 with a fixed IP adress, later.)
- Tab: Shared Folders
- enables to mount this location within my VM, so I can exchange files between Host and Guest.
- I choose my Downloads directory, where I have downloaded the Oracle Datbase and WebLogic
Server.
- Folder name: Downloads
- select auto-mount (so the folder will be mounted automatically when starting the VM)
-> OK
------------------------
Sometimes, in addition the Host-only network needs defining:
Thanks to Christian for the screen shots!
------------------------
Install Oracle Linux
- start the VM

- choose install or upgrade
-> enter
- once you have checkt the install media is ok ...
-> skip
-> next
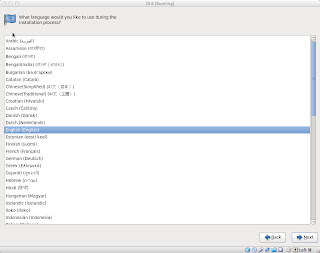
- choose the language for installation
-> next
- choose your keyboard
-> next
- choose the storage devices. I choose
- Basic Storage Devices
-> next
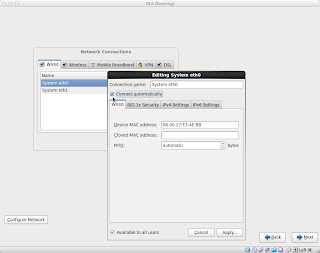
- specify the hostname. (i.e. ol6.de.oracle.com)
- ATTENTION:
-> click network settings
- select "connect automatically" in order to DHCP on startup
-> apply
-> next
- choose your time zone settings
-> next
- select and remember! your password for the admin user "root"
-> next
- as the 100GB parition is empty choose
- replace existing Linux Systems
- ATTENTION:
- "select "review and modify partitioning layout"
-> next
- the partition layout is not ideal. We will delete the "lv_home" partion and add this partion space to
the "lv_root" partion
- choose "lv_home" partition
- delete
- select the "lv_root" partion and enlarge it to the max available space (Max size is ...).
- 97864
-> OK
-> next
-> Format
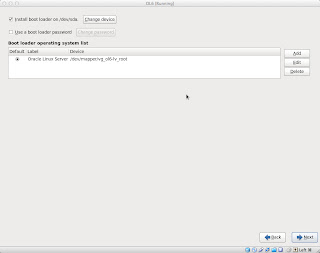
- I do not change the boot loader settings
-> next
- for the software of the Linux Server select
- Basic Server
- ATTENTION:
- select "Customize now"
-> next
- Base System
- select: Base
- Servers
- select: Server Platform
- Desktop
- select: Desktop, Graphical Administration Tools, X-Window System
- Applications
- select: Internet Browser
- redy to install ...
-> next
- once the install and configuration finishs, click
-> Reboot
-> Forward
- read the License Information
- choose to agree or not agree
-> Forward
- if you have an Oracle support contract, or like to initiate one, do so. For this howto I will do so later.
-> Forward
- skip to create a user. We will add a package in a later step, that not only creates a user, but also adds
required groups and kernel settings and so on
-> Forward
- You can choose to sysnc system time. I do not choose this for this document
-> Forward
- I skipp Kdump, although there might be a good reason for Kdump
- Finish
- the login screen appears. As we have only the root user so far, log in as
- root
- password you have set before
-> Log In
- first I add a Terminal start button to the panel
- then I delete the Mail Icon - we will not need it
- now we configure the server with a public-yum server, where to get the latest packages and security
updates from Oracle
- start the firefox browser. Navigate tothe page
- public-yum.oracle.com
- scroll down the web page for the "howto configure with Oracle Linux 6"
- open a Terminal
- change to the directory: ("cd" means: change directory)
- cd /etc/yum.repos.d (Linux differs between capital letters!)
- now we download the configuration fire with a command line browser wget:
- wget http://public-yum.oracle.com/public-yum-ol6.repo
- the file shoud be configured to automatically suggest the latest repoitory and Oracle Kernel setting
- if not, edit the file with the famous editor vi:
- vi public-yum-ol6.repo
- change enabled=0 to enable=1 if needed
- now update the Linux packages:
- yum update
- y to update suggested updates.
- y for the keys
- the kernel updates need a restart of the system:
- reboot
- the following comands are just to chek the running kernel:
- uname -a
- while the lollowing lists installed Oracle kernels:
- rpm -q kernel-uek
- next we will prepare the Linux Server for Oracle. In Oracle Linux 5 the Package oracle-validated
represented a package which creates the oracle user, required groups, sets kernel and security
parameters, limits etc. and required packages. With Oracle Linux 6 oracle-validated has been
replaced by the package "oracle-rdbms-server-11gR2-preinstall"
- to install the package is easy:
- yum install oracle-rdbms-server-11gR2-preinstall
- enter
- click y to apply
- now, the system also has all required files to build the vboxadditions:
- escape out of the VM (keys are shown in the corner right down: Left "cmd")
- autorun
-> OK
- now we need to set the password for the oracle user:
- passwd oracle
- (remember the password you set!)
- only a few steps to do
- define the fixed IP adress:
- Menue: System - Preferences - Network Connections
- System eth1 - edit
- ATTENTION:
- select connect automatically
- IPv4 Settings:
- Method: Manual
- Address: 192.168.56.60 (192.168.56.x is the defauld VBox network configuration)
- Netmask: 255.255.255.0
- Gateway: 192.168.56.1
-> apply
- now we need to configure the shared folder between Host and Guest VM. We need to add the VBox
shared folder Group to the oracle user:
- Menue: System - Administration -Users and Groups
- select the oracle user:
- properties - scroll down and select
- vboxsf
-> OK
- just before the final reboot we need to edit the hosts file:
- vi /etc/hosts
- add the following line:
- IP Address fully qualifies hostname alias
- 192.168.56.60 ol6.de.oracle.com ol6
- safe and close the file:
- esc
- :
- wq!
- check the network and loopback settings
- ping ol6
- ping ol6.de.oracle.com
- hostname

- create the folders for the oracle software install:
- mkdir /opt/oracle (mkdir: make directory)
- chown -R oracle:oinstall /opt/oracle (chown: change owner des verzeichnisses von root an oracle)
- chmod -R 775 /opt/oracle (Berechtigungen ändern)
- finaly it is a good moment to backup our work:
- poweroff the VM.
- export the VM:
- Menue: File - export Appliance













 -
- 


